SKETCHUP LESSON PLAN
For this project you will learn how to use a 3D Modeling program called Sketchup.
Here's how to create your account and get started:
Go to sketchup.com
2. Click on “Try Sketchup” in the lower left corner to create your free account.
3. Select the “primary & secondary” tab on the right
4. Click "GET STARTED"
5. Click Student
6. Click LAUNCH
7. Sign in with Google - Make sure you are logged in with your PPS Google Account.
Choose your @student.pps.net account
This part may sound scary, but let’s just go ahead and trust those nice Sketchup people and click the blue Allow button.
8. And now you have your very own free sketchup online account for a few weeks.
This is the Sketchup Home Screen.

9. Start by Taking the tour

Click through the prompts to complete the tour.
10. Click this link to let Mr. Gilley know you’ve completed the tour:


________________________________
Tutorials
Paste a screenshot of each completed tutorial into the Turn-in Google Doc. Make a copy of the doc into your Drive, first.
Tutorial 1 - Welcome - when you're done, your project should look
something like this:

Tutorial 2 - Orthogaphics
Finished work should look something like this:

Tutorial 3 - Build a cell
Finished tutorial should look something like this:

____________________________________________________________________________________
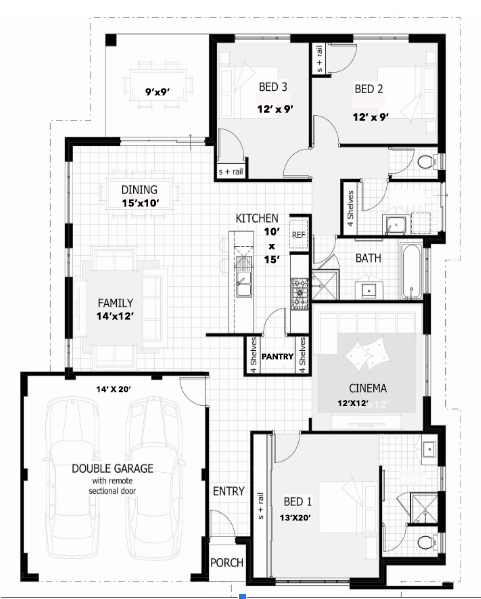
3. Final Floor Plan:
Your house must be fully furnished, with the following items:
Three bedrooms and three bathrooms.
Pay attention to the dimensions of each room.
Furniture in every room. However, if you computer is glitching out a lot, leave this step for the very end.
Floor coverings (carpet, wood floors, tile, stone, etc.)
Appliances - refrigerator, stove, dishwasher, washer and dryer, etc.
Fixtures - toilet, tub/shower, sinks,
Things on the Walls, such as art, pictures, mirrors, posters, etc.
Make it look “lived in.” In other words, furniture, clothing, maybe some food on the counters or table, etc.
You can add rooms, but have the rooms in the drawing at the minimum.
Exterior windows in every room.
Create a floor